Posts

Xiegu XPA-125B: Firmware update and unbricking

A firmware update went wrong and I bricked my Xiegu XPA 125B amplifier. This is the story of how a bit of patience and help in groups.io helped me bring it to live. The Xiegu XPA 125B amplifier is at the core of my 100W HF station, as I use it with the 705 almost every day. The 705 outperfoms my old and drifty 7100, and this amp helps me get out with around 100W. Needless to say, when the amp was bricked during its first firmware update, I wasn't happy. Good thing, this amp has caught the attention of the ham community, and there is a strong and tech-savvy group of people than has come across this before. Thanks to KN6LZV for pointing me in the right direction in groups.io . DISCLAIMER: I'm adding this for my own personal reference in the future. I'm not responsible in any way if you end up bricking your amplifier, nor I would be made responsible for that. However, if you find yourself in the same situation, here's the end-to-end process to update the firmware on the Xi

AllStar Node CM108 sound fob modification (final drawing and procedure)

Image
  AllStar Node CM108 sound fob modification Use a heat gun to desolder the audio plugs. This will expose pins 1 to 12 Use a soldering iron to desolder C2, R6 and R7 Cut the tracks from pins 2 to 5, 7 to 8 and 8 to 11. Use a multimeter to verify that there is no continuity between them. Add a 2N3904 transistor. Collector goes to pin 5, base to pin 8 and emitter to pin 9 Add a thin wire from pin 5 (it will activate PTT on the radio) Add a 10KΩ resistor between pins 7 and 8 Add a 32 AWG ultra flexible wire between leg (a) on the chip and pin 7 Add a thin wire from pin 7 (it will go to the TX LED on the front panel) Add a 32 AWG ultra flexible wire between leg (b) on the chip and the solder spot to the right on the space left by C2 Add a thin wire from pin 1 (it will go into the audio input on the radio) Add a 10KΩ resistor between ping 2 and 3 Add a thin wire from pin 2 (this is the COS wire) Add a 1KΩ resistor between pins 11 and 12 Add a 32 AWG wire from leg (c) on the chip

Packet Radio on a Raspberry Pi the cheap way!

Image
Packet radio is, in essence, the transmission of data over radio using a protocol called AX.25. It is the mechanism of transmission under the hood for APRS. However, APRS is unconnected packet, while Packet Radio is connected. This implies that Packet can be used for a number of other applications, such as keyboard-to-keyboard chat or connecting to a mail server or a BBS -- not just "blast away" the message. In this post, I'll cover how to install and setup packet radio from a Raspberry Pi, without any additional hardware, and for a fraction of the cost. A terminal showing the output of the HELP command in a TNC I was recently introduced to the wonders packet radio. It has both a post-apocalyptic and 80's nerd feelings to it that I'm enjoying a lot. The fact that my background is in computer science might have something to do with it, too. Packet Radio is a marketing term to refer to AFSK-modulated FM using AX.25 at 1200 baud (or 300 baud on most HF bands). Tradit

Radio adventures in an apartment complex

Image
Radio is the greatest hobby if you live in the countryside. But you live in an apartment complex in the center of a 9 million people city, and you cannot install that 60-meter-long doublet that you've seen on YouTube anywhere. Now what? Hire rise buildings are not really RF friendly Let's all acknowledge that amateur radio is a great hobby. Specially if you live in an area where you are not physically limited by the space you have. In this case, you can set up your 10m tall vertical antenna, and lay down all that copper wire that you need to create your 120 radials ground plane. But this is not your reality. You live in a 60m^2 unit on the 4th floor of a eight-storey high apartment block, surrounded by even taller buildings in every direction. And you still want to play radio. Now what? Background When I first move to London, I used to live in a tiny ground flat in a Victorian house in the South West. I had access to small back garden, where I installed a co-linear white stick

Setting up APRS on the Raspberri Pi

Image
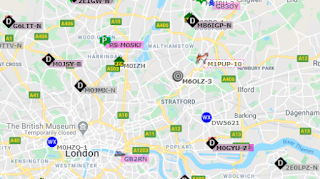
Creating a APRS gateway with a Raspberry Pi is not easy. It requires several complex steps, and mistakes can be made. In this guide, I'll show you how to run Hamlib, Direwolf and XASTIR on a Raspberry Pi on the easiest possible way. A small sample of APRS signals around London, from aprs.fi APRS is big fun. Creating an igate/digipeater is not. Specially not on a Raspberry Pi. This step by step guide shows how to make Hamlib, Direwolf and XASTIR work together to send and receive APRS packets from your Pi. Even if you have no previous knowledge about Raspbian, copying and pasting the commands below will lead you to a successful installation and configuration. 1. Install a Real Time Clock source via USB There's plenty of in-depth tutorials on how to do this. Probably the best one, in my personal opinion, is the video that Julian OH8STN has on YouTube . If you get confused by these commands, go and take a look at his video. Open a terminal in your Raspberry Pi and type these comman

Making APRS work on the AnyTone AT-D878UV

Image
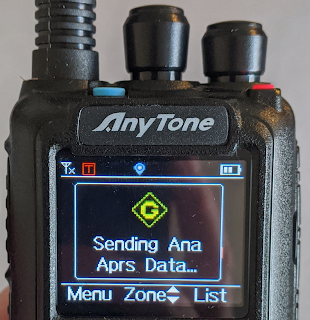
APRS is super cool. For this post, I've prepared a step-by-step guide to show you how to make APRS and DPRS work for the 878. The 878 TX-ing APRS in the European frequency APRS is super cool and extremely fun. In full honesty, I think that Anytone missed an opportunity to create a DMR radio with full APRS capabilities  with the 878. However, you can still send APRS and DPRS packages using this radio, both over analog APRS and over DMR. It-s simpler than it looks, it you follow the instructions carefully. The first thing you need to do is to activate the APRS functions in the programming software. In case you are not familiar with the Anytone programming software, I strongly encourage you to visit my previous post , that will show you how to create a basic codeplug. Once in the programming software, go to the Tools menu and click on Options, like this: Then, a new window will pop. Make sure you select both APRS and GPS, as in the next image: Once select

Callsign routing in D-Star

Image
The following post summarizes the adventures of Matt (M0KJI) and Pablo (me, M0PQA): two middle aged men, less than 2 miles away from each other, trying to talk on their 7100s.  One of the features of D-Star that I enjoy the most is callsign routing. I enjoy what it does as much as how it does it. Using the IRC protocol for implementing call routing in the core of D-Star is an exercise of pure ingenuity that I truly appreciate. The ircDBB network. Diagram from here Callsign routing has been around in D-Star since forever. Even the now yellowish user manual of my 7100 shows how to do it. However, with the proliferation of hotpots, the backbone of callsign routing for D-Star decided to service only proper repeaters, and leave hotspots without access to their network. This decision triggered rapid changes in the default configuration of Pi-Star, the software that you are running in your hotspot, to make use of a different network, named Quadnet - www.openquad.net rr.o